Tutorials
These tutorial videos provide excellent instruction on some of the basic steps for setting up and using your Attendance Manager Cloud subscription. For comments or suggestions on any of these or for additional instruction requests, please reach out via the Contact Us page.
Chapter 1 - License Activation and Overview
Activate your Attendance Manager Cloud (AMC) license, create your own password, and then learn your way around the app.
Chapter 2 - Entering Students
In this chapter, we will cover how to enter student names, numbers and additional information into Attendance Manager Cloud for later enrollment into classes.
Chapter 3 - Creating Classes
In this chapter, we will cover the creation of classes and a few options on how classes can be managed within the app.
Chapter 4 - Enrolling Students into Classes
Once you have students entered and at least one class created, you can then enroll students into their individual classes.
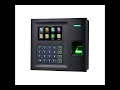
Chapter 5 - Attendance Terminal Setup
The Attendance Terminal is an electronic timeclock that can be placed in the classroom to record student clock-in and clock-out times. The Attendance Terminal has a full color display, a keypad, and either a fingerprint scanner or a barcoded ID card scanner, providing multiple student clock-in options. The Attendance Terminal communicates with Attendance Manager Cloud via your school or classroom network. This chapter will discuss how to install and configure the Attendance Terminal so that you can begin collecting student clock-in and clock-out times.
Chapter 6 - Capturing Student Fingerprints
This chapter is for those using the Attendance Terminal with Fingerprint Scanner. Before students can begin clocking into class, each student's fingerprint must be recorded in the terminal, which then provides accurate verification of each fingerprint scan.

Chapter 7 - Transfer Hours
The Transfer Hours feature is a powerful tool for adding a block of time that each student has acquired prior to the time recorded each day in Attendance Manager Cloud. The two primary examples of where this is used are: 1) If you are implementing Attendance Manager Cloud for the first time and want to enter prior hours, and 2) If a student transfers into your program mid-session from another licensed school, you can enter the block of time from that prior school.